Tomatoes
There are many different types of tomatoes, and each seasoned gardener will have their favorites. Here is way more information than you ever needed to know about tomatoes so you too can find your favorite:
Planning
One of the first things to do when starting your tomatoes from seed is to plan out your garden. You need to figure out how much space you have for your tomato plants. Once you select where you’ll put them, then you can begin to decide what kinds of tomatoes you want. Do you have room for a large plant or need a miniature variety, do you like big beefsteak style, or ones for sauces or sandwiches. Do you want determinate (bush type, one batch of fruits) or indeterminate (vine type that will produce as long as the weather holds up).
Whatever kind you want, you’ll need a bright warm spot for most of the summer that gets good airflow. Once you have chosen the spot and variety you’ll need to figure out your gardening zone and last frost date. You can check the Canadian Natural Resources website for the hardiness zones. Canada’s Plant Hardiness Zones
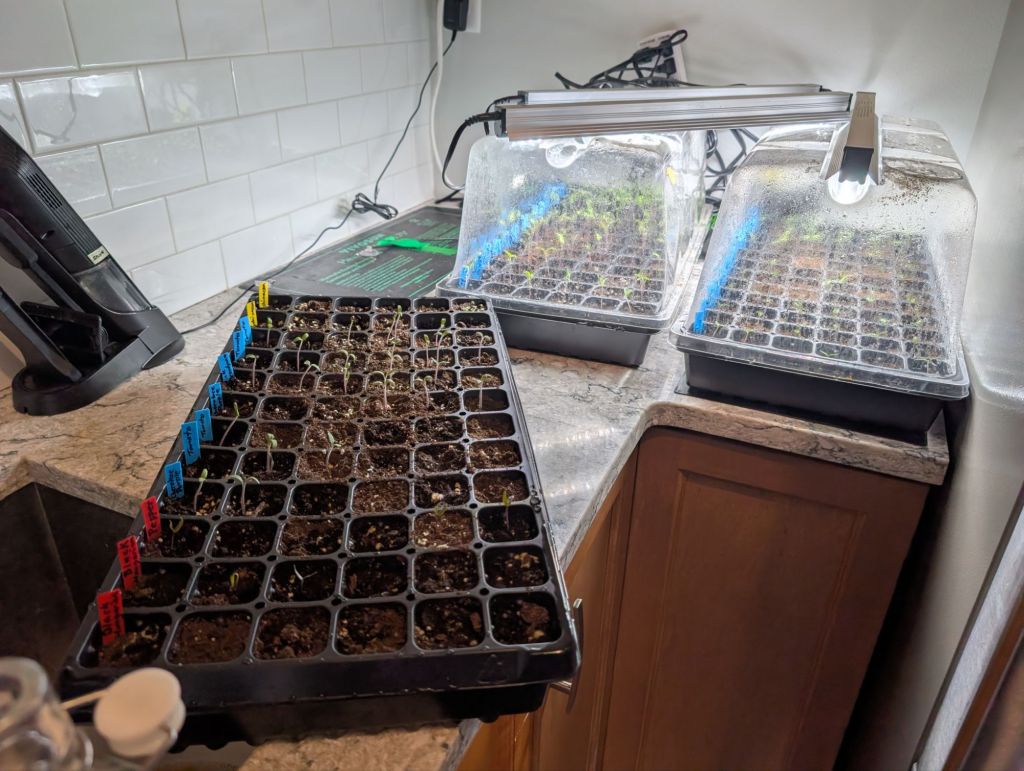
Seeding is the second step to growing your own beautiful tomatoes from the start. You first want to make sure you’ve got all the bits and bobs you need – heat mats, lights, humidity domes, soil etc. Once you have everything gathered, then the messy fun begins. No matter what kind of plant you are starting from seed, you’ll have to pick a medium to start them in. Lots of people use peat moss pellets, others prefer to make their own soil blocks or soil mix in little miniature pots. Whatever you choose, make sure it’s well drained, and in ideal conditions for the plant you want to grow. You also want to be diligent about labeling what’s what as you plant. I’ve had a few times over the years where I had plans for labels once the tray was full, then something pulls you away from planting and you have to guess at where you left off.
For tomatoes you will need a heat mat (preferably with thermometer/thermostat), and a humidity dome. Personally I’m a big fan of the sunblaster nano domes. This helps ensure optimal growing conditions for your little seedlings but also will help protect them against issues like damping off, or pesky little kitties who want to nibble. If you have a heat mat with thermostat, you are aiming for about 27°c until they germinate. After they pop up, you’ll want to reduce the temperature to 15-20°c and add bright full spectrum lights for 14-16 hours a day.
No matter the method you used to start your seedlings, they will quickly grow out of their initial peet pot/seedling starter. After a few weeks those delicate seedlings and roots need more space to grow and thrive. Moving them to a bigger space is called “Potting Up”. There are a few things you can do to help your little seedlings grow into the robust tomato plants you need them to be in order to survive the next few months and produce a bountiful harvest.
Small increases
When potting up you want to be mindful of the size you’re planting into. For example, your seedling is in a 2 inch pot so you don’t want to go much bigger than a 4 inch pot next.
Easy on the fertilizer
Seedling roots are still very delicate. If you give them a heavy dose of fertilizer you risk burning the roots. If you are going to switch from seedling soil to a veggie and herb blend, do it gradually through a mix in. Personally I use 1/4 veggie blend 3/4 seedling mix the first time I pot up. Depending on how early the spring starts and temperatures warm up, I might have to do a second round of potting up, at which point I’ll usually do half/half, or 2/3 veggie mix.
Hardening Off
Once spring appears to finally be upon us, for many gardeners it’s time to begin hardening off our tender little seedlings. Just like humans, tomatoes (and all plants) need a little bit of time to adapt to new environments. Hardening off is the process of gradually and gently exposing plants to outdoor conditions like sun, wind, rain and cooler nights. If you have a greenhouse this can start a little earlier, but you want to avoid night time temperatures dropping below 10c, stunting their growth. If you do have a greenhouse I highly recommend a Bluetooth temperature monitor.
For the first day or so bring the plants outside, ideally in the morning for a couple hours but bring them in before the noon Sun hits them. Their little leaves aren’t ready for the full strength of the sun. Start out very gentle, a few hours in dappled sun will be plenty. Gradually increasing the exposure for 1-2 weeks depending on the weather. Once they’ve adjusted to the outdoors and nighttime temps are consistently 10 degrees or more, you can plant your seedlings in their permanent home.
Planting Out/Transplanting
Tomatoes like well-drained sites that receive full sun for most of the day. If the seedlings are still small or not hardened off they will need to be gradually introduced to full sun. The soil pH should be slightly acidic (6.2 to 6.8).
There are many different thoughts on the best way to transplant your tomatoes but here’s my tried and true method:
Wait for an overcast day if you can. Cloudy but dry is ideal.
Dig a hole as deep as possible and at least as wide as the current pot it’s in. Then (this is optional but I swear by it) plunk a raw egg, shell and all into the bottom. Give it a crack or two with your shovel then pop your tomato into the hole on top of the egg. The theory is that the calcium and nutrition from the egg gives that beautiful seedling an extra boost.
You want to bury your tomato right up to the bottom set of it’s first set of true leaves. If your plant is very tall and leggy you can pinch the bottom set of leaves off. Tomatoes are very cool, as they have what’s called adventitious roots, they can grow new roots from their stems. This means if you do have a seedling break off, you can plant it in soil and it should keep on trucking. It’s good to keep in mind that more roots = better nutrient and water transfer.
If a plant is quite root bound (where the roots are wrapped in circles and it doesn’t seem to have much dirt) very gently loosen them by rolling in your hands. This will allow them to spread out and get more nutrition from the soil.
Give it a little drink of water and let it settle in. They will take a few days to push out more roots before focusing on more leaves.
Watering
Tomatoes don’t like wet leaves so try to avoid watering from above but if they do get a bit of water on them they will survive. Water deeply and consistently especially once you have fruit, not letting them dry out too much then soaking them or you can get splits in your tomatoes, blight or tomato leaf mould. Watering is generally best done in the early morning, giving plants to absorb what they need before the heat of the day hits and evaporation occurs. If it’s been an exceptionally hot day, a little drink before bed isn’t a bad idea, especially if the plants are showing signs of stress like wilting or browning leaves. As fall arrives and the rains return cut back your watering, and if there’s a huge storm in the forecast you can take the extra step to protect them from the battering by covering with plastic or a tarp.
Pollination
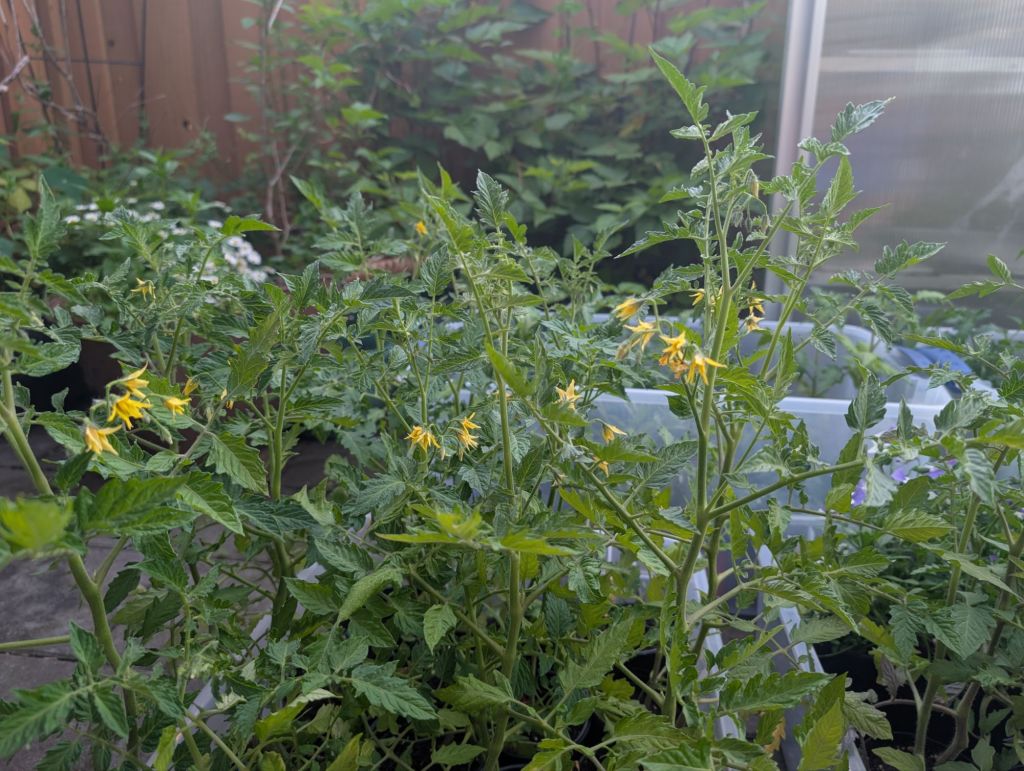
Tomatoes require pollination in order to produce fruit. Their little yellow flowers need a little bee or other creature to knock the pollen into place so they fruit. Plant other flowers nearby to attract pollinators, or you can take up the job yourself with a little paintbrush or q-tip. Buzzing sound effects are optional but highly recommended.
Tomatoes are heavy feeders, so they’ll need a boost or 2 of nutrients throughout the growing season. Early on while your focus is on growing leaves something with a good amount of nitrogen is ideal. Once your plants begin to flower and fruit you’ll need to give them phosphorus and potassium to keep up the production. For the main growing season I like to use Promix Organic tomato and vegetable 4-4-8. Once the nights start to get colder in late August or early September I back off the fertilizer completely as anything that hasn’t started developing likely won’t have time to finish growing before frost hits.
Pruning
If you’ve spent time around Gardeners you may have heard that you need to prune your tomatoes. Before you get out the clippers to give your plants a hair cut, there’s a few things you should know.
Do all tomatoes need pruning?
No, in fact you don’t need to prune them at all, but many people swear pruning will give you bigger or more plentiful crops. Something to note is that if you are so inclined to prune you only want to prune indeterminate (vining) types of tomatoes.
As the season winds down and the weather starts to turn you can start to remove the lower leaves to help improve air flow and discourage mildew/rot. You might also find some sneaky tomatoes hiding under those leaves. Once they get into the sun they will start to ripen.
The experience of plucking a sun warmed ripe tomato off the vine for a quick snack is one of life’s great joys. Harvest your tomatoes as they ripen during the season and it will encourage the rest to keep growing. Once the weather begins to turn you can pick any that have a hint of colour for windowsill ripening. If the weather is about to get awful or frost is coming you can pick your green tomatoes and put them in a cardboard box for ripening. If you do this make sure you check them every few days to take out any that go bad or start getting black spots (blight).
Cleaning up/prepping for Winter
Once the last tomatoes are picked it’s important for your soil and future tomatoes to get the old vines out. Normally I advocate for letting things break down back into the soil but blight can carry over to future years so pick up any fallen/rotting tomatoes and do your best to get the old leaves and vines removed once the season is over. If you are planting in beds or have lots of space to work with, crop rotation can help with soil health and keeping the nutrients in the soil. For pots and baskets you’re going to be better off starting with fresh soil next year since tomatoes will have used up most of the nutrients over the summer. The left over soil can still be used for other crops and amended with compost.
As winter sets in it’s time to start dreaming about the next season, make notes on what worked or didn’t work, varieties you liked and any other lessons learned. Keeping notes year to year can really help you learn about the space you’re working with, and as much as we want to remember everything, we simply can’t. Now it’s time to rest, recover and then start dreaming of future plans.
Happy Planting!
